Welcome to the wonderful world of burger-making! If you’ve ever struggled with uneven patties or dealt with sticking meat on your grill, the non-stick burger press is about to become your new best friend. This handy kitchen gadget not only simplifies the process of crafting the perfect patty, but it also ensures that every bite is bursting with flavor. So, whether you’re planning a backyard barbecue or a cozy family dinner, let’s explore the benefits and tips for using a non-stick burger press to elevate your burger game!
Key Takeaways
- Non-stick burger presses simplify the burger-making process by preventing patties from sticking.
- Selecting the right material is crucial for durability and effective non-stick performance.
- Using a burger press involves a few simple steps to ensure perfectly shaped patties every time.
- Regular maintenance, including proper cleaning, extends the life of your non-stick burger press.
- Experimenting with diverse recipes can elevate your burger experience beyond the classic beef patty.
Understanding the Benefits of a Non-Stick Burger Press
When it comes to crafting the perfect burger, having the right tools can make all the difference. A burger press non-stick model stands out for its convenience and efficiency, allowing you to achieve a mouthwatering result with ease. First off, the non-stick surface saves you from the hassle of dealing with meat that sticks to your press, which can often lead to uneven patties or a messy cleanup. Imagine effortlessly popping out perfectly formed burgers, ready for grilling or frying, without losing any of that juicy flavor.
Beyond ease of use, a non-stick burger press also promotes uniformity in size and thickness, ensuring that each burger cooks evenly—a crucial factor if you’re hosting a backyard barbecue. This means no more guessing games with cooking times or playing culinary roulette with undercooked or overdone patties. Plus, with better heat distribution, you can enjoy that delicious, caramelized crust on every burger.
Thinking about versatility? They often come with adjustable settings that let you customize your patty thickness, giving you the freedom to cater to everyone’s preferences, whether they like a classic thin burger or a hearty, thick one. And let’s not overlook the health benefits! Non-stick surfaces usually require less oil or fat for cooking, so you can indulge in a flavorful meal while keeping your health goals in check.
Incorporating a burger press non-stick into your kitchen isn’t just about convenience; it’s about enhancing your burger-making experience. From backyard cookouts to cozy family dinners, this tool can easily become a staple in your culinary arsenal, impressing loved ones with perfectly crafted burgers time after time. So why not give it a try and elevate your burger game?
Choosing the Right Material for Your Non-Stick Burger Press
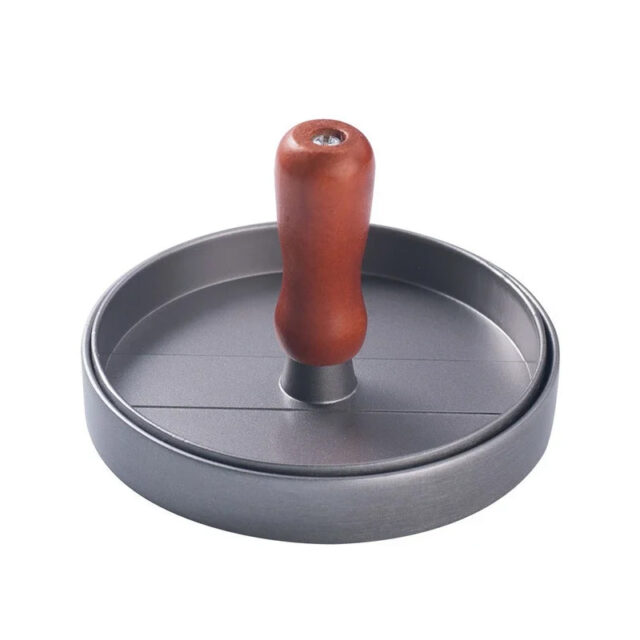
When it comes to crafting the perfect burger, having a reliable burger press non-stick is a game changer. A good burger press not only forms neat patties but also enhances your cooking experience by ensuring that your meat doesn’t stick to the surface. But with so many materials available—from stainless steel to silicone—it can be overwhelming to decide which one is right for you. First off, let’s explore the benefits of each material. Stainless steel is durable and often favored for its sturdiness and ease of cleaning. However, if you’re on the hunt for something that truly embraces the non-stick feature, silicone burger presses are your best friends; they flex easily, allowing you to pop your patties out effortlessly. Plus, silicone is often dishwasher-safe, making cleanup a breeze.
If you lean towards eco-friendliness, bamboo is another fantastic option. While not as common, a bamboo burger press is lightweight and naturally resistant to bacteria, plus it brings a unique aesthetic to your grilling tools. It’s essential to consider not only how the material feels in your hands but also how it interacts with heat; silicone can handle high temperatures without warping, while wood might require a bit more care to maintain its integrity.
Choosing the right material ultimately depends on your cooking style and maintenance preferences. If you love grilling frequently and want something easy to clean, a silicone burger press might be ideal for you. But if you appreciate durability and a classic feel, stainless steel could be worth the investment.
‘Good food is the foundation of genuine happiness.’ – Auguste Escoffier
Step-by-Step Guide to Using a Burger Press
Using a burger press can elevate your grilling game and yield perfectly shaped patties that cook evenly. Whether you’re a seasoned pitmaster or a casual cook, a burger press non-stick model simplifies the process and adds a level of professionalism to your backyard barbeque. Here’s a straightforward, step-by-step guide to help you maximize your burger press usage, ensuring delicious results every time.
### Step 1: Gather Your Ingredients
Start with quality ground meat, whether beef, turkey, or a plant-based option. The fat content is key—around 80/20 for beef is typically recommended for juicy burgers. Don’t forget your favorite seasonings! You may want to experiment with salt, pepper, garlic powder, or even some fresh herbs for a flavor boost.
### Step 2: Prepare Your Burger Press
Before you dive into making your patties, make sure your burger press non-stick surface is clean and ready. While many models resist sticking, adding a light mist of cooking spray can prevent any potential mess and help with cleanup later. If it’s a two-piece press, assemble it properly, ensuring it’s ready to form those perfect patties.
### Step 3: Portion Out the Meat
Using your hands, divide your ground meat into equal portions, typically around six to eight ounces per patty. This ensures that your burgers will cook evenly. A kitchen scale can be handy here if you want precision, but simply eyeing it often does the job just fine.
### Step 4: Shape the Patties
Take a meat portion and gently shape it into a ball before placing it in the burger press. If you have a non-stick burger press, you can simply place the ball in the bottom half of the press and close the top. Apply even pressure as you press down; the goal is to create a uniform patty that’s about three-quarters of an inch thick. This thickness balances cooking time and juiciness.
### Step 5: Add a Dimple (Optional)
To prevent your burgers from puffing up during cooking, create a slight dimple in the center of each patty with your thumb or a spoon. This little trick helps your burgers cook flat, promising a perfect fit in your buns.
### Step 6: Season the Patties
Once you have your patties formed, it’s time to season them. Sprinkle your desired seasonings generously on one side, then flip the patties over and do the same for the other side. Seasoning just before you cook will ensure that the flavors are locked in while the patties are grilling.
### Step 7: Cooking Your Burgers
You can cook your burgers on a grill, stovetop, or even in the oven. A medium-high heat is ideal, and remember, avoid pressing down on the patties while they cook! This traps the juices inside and keeps them flavorful. Depending on your meat choice, cooking time will vary—beef usually takes about 4 to 6 minutes per side for medium doneness.
### Step 8: Rest and Serve
Once the patties are cooked to your liking, let them rest for a few minutes. This allows the juices to redistribute, resulting in a juicy bite every time. Serve them on buns with your favorite toppings—lettuce, tomato, pickles, cheese, and special sauces highlight the foundational flavors of your labor.
### Conclusion
Using a burger press non-stick model makes the process of creating delectable, uniform burgers simple and enjoyable. With just a few steps, you can transform your grilling experience and impress your family and friends at your next cookout. If you haven’t tried investing in a quality burger press yet, consider adding one to your arsenal—this small tool can make a big difference in your culinary adventures!
Tips for Maintaining Your Non-Stick Burger Press
Maintaining your non-stick burger press doesn’t have to be a complicated or time-consuming task. In fact, a few simple practices can help extend its life and keep your burgers flipping beautifully every time. Start by always washing your burger press by hand rather than tossing it in the dishwasher. The high heat and strong detergents in dishwashers can wear down the non-stick coating over time. Instead, use warm, soapy water and a soft sponge. If there are stubborn bits stuck on, a gentle scrub with a non-abrasive pad can usually do the trick without damaging the surface.
Once it’s clean and dry, consider applying a light layer of cooking oil to the press before storing it. This will help maintain that non-stick attribute and create an additional barrier against wear and tear. Another tip? Avoid using metal utensils or abrasive tools when handling your press, as these can scratch and damage the non-stick coating. Instead, opt for silicone or wooden spatulas that will keep your burger press non-stick for longer.
And lastly, remember that seasonality can affect your cooking tools—if you haven’t used your non-stick burger press for a while, give it a thorough check before firing up the grill. A quick wipe-down can often reveal any wear that needs attention. These simple steps will ensure that your burger press remains a beloved kitchen companion for many summer barbecues to come.
Creative Recipes to Try with Your Burger Press
If you’ve recently invested in a burger press, you’re in for a treat! A burger press non-stick model makes it easier than ever to create delicious, perfectly-shaped patties without the hassle of cleanup. While it’s a fantastic tool for making traditional burgers, let’s explore some creative recipes that will inspire you to think beyond the classic beef patty. Ready to spice up your grilling game?
### Stuffed Burgers: A Flavor Burst in Every Bite
Why settle for an ordinary burger when you can enjoy the surprise of a stuffed patty? Using your non-stick burger press, you can create an amazing dill pickle and cream cheese stuffed burger. Simply combine ground beef or turkey, mold half into the press, add a dollop of cream cheese mixed with chopped dill pickles, and then top with the other half of the meat before pressing down. The result? A juicy burger with a creamy center that’s sure to impress at your next barbecue.
### Veggie Delight: Portobello Mushroom Patties
For those looking to switch things up, why not try a veggie burger? A non-stick burger press works wonders with portobello mushrooms. Just remove the stems from large portobello caps, marinate them in your favorite seasoning mix, and press them into the mold. Grill until tender and serve them with fresh vegetables and a drizzle of balsamic glaze. You’ll get a hearty, flavorful alternative that satisfies both vegetarians and meat lovers alike.
### Breakfast Burgers: Kickstart Your Day
Imagine starting your day with a delicious breakfast burger that combines your morning favorites! Use the burger press to shape sausage patties seasoned with sage, and grill them until golden brown. Top with a fried egg and slice of avocado for a delicious twist on a traditional breakfast. Serve the whole creation on a toasted English muffin for a complete meal that’s quick and easy.
### Asian-Inspired Chicken Burgers
Give your grill a fusion twist by experimenting with Asian flavors. Combine ground chicken with soy sauce, ginger, and green onions using your non-stick burger press. Grill these patties and serve them in a bao bun (or lettuce wrap for a low-carb option) with pickled ginger and slaw. This innovative approach to burgers brings a new depth of flavor to the table.
### Dessert Burgers: Yes, You Can!
And for the sweet tooth? Believe it or not, you can use your burger press to make dessert burgers! Shape cookie dough into thick patties using your press and bake them to perfection. Once cooled, layer with a scoop of ice cream and sprinkle some chocolate chips or fruit on top. Place another cookie on top to create a burger-like finish. It’s a fun treat that’s perfect for summer gatherings.
### In Conclusion
With a burger press non-stick model in your kitchen, the sky’s the limit when it comes to creating unique and delicious recipes. From hearty stuffed burgers to lighter veggie options, you can impress your family and friends with homemade creations that go beyond the ordinary. Embrace these ideas and let your creativity shine as you fire up the grill. Happy cooking!
Frequently Asked Questions
What is a non-stick burger press?
A non-stick burger press is a kitchen tool designed to shape and mold ground meat or other ingredients into burger patties without sticking, making it easier to cook and clean.
What are the benefits of using a non-stick burger press?
Using a non-stick burger press simplifies the patty-making process, ensures uniformity in size and thickness, reduces mess, and allows for easy removal of the patties without damage.
What materials should I look for in a non-stick burger press?
It’s best to choose a non-stick burger press made from durable materials like BPA-free plastic or silicone, which provide excellent non-stick properties and are easy to clean.
How should I maintain my non-stick burger press?
To maintain your non-stick burger press, hand wash it with mild soap and water, avoid abrasive sponges, and check the manufacturer’s recommendations for specific cleaning instructions.
Can I use my non-stick burger press for recipes other than burgers?
Absolutely! A non-stick burger press can be used to make a variety of patties, including veggie burgers, chicken patties, and even desserts like cookie dough!